How to Use Auto-Responders to Get a Handle on the Holiday Rush

A guide to using Replyco’s auto-responders to ensure that your customers aren’t left hanging during the holiday break.
Black Friday and Cyber Monday are in the rearview mirror, but with Christmas, Boxing Day and New Year’s fast approaching, holiday shopping isn’t slowing down quite yet — in fact, just the opposite. Last-minute shoppers everywhere are rushing to secure gifts online and consequently, more digital orders, like gift card purchases, are placed on Christmas Eve than any other day of the entire holiday season. Additionally, data from Statista reveals that during Christmas and Boxing week, the United States sees more mobile eCommerce traffic than any other week throughout the holiday season.
The point? Between a last-minute surge of digital orders, an influx of mobile traffic, and New Year’s promotional offers, it’s no time to get complacent with your eCommerce customer communications — especially considering the widespread shipping delays this time of year. However, that doesn’t mean you and your team aren’t entitled to a break just like everyone else.
With Replyco’s fully customizable smart auto-responders, you can effortlessly manage the holiday rush and meet customer expectations for a quick and personalized response, without having to lift a finger until you’re back in the office and able to respond to those customers directly. While auto-responders aren’t a substitute for direct, human interaction, they ensure that your customers aren’t neglected when no one’s around to address their concerns. They also help convey your brand’s commitment to delivering stellar customer service. So, with that being said, let’s take a look at how you can use Replyco’s auto-responders when you’re out of the office on Christmas, Boxing Day, and New Year’s Day.
Creating Auto-Responder Messages
Before diving into the technical aspects of setting up Replyco auto-response rules, let’s talk about how you’ll want to craft your auto-response messages, as well as how you can specifically tailor them for the holidays to address customer needs while adding a personal touch with your brand voice.
Subject Line and Body Text Best Practices
No matter the time of year, you’ll want to begin by creating a subject line that speaks directly to your audience with clear and concise language, notifying your customers that their message has been received. Try to keep it within 45 characters to ensure that the subject line can be fully read on any size screen. It doesn’t have to be complicated — a simple “Thank you for your message!” subject line works here.
However, In both the subject line and body, be sure to avoid sounding robotic. Simply put, if your automated message sounds too…automated, it may not count in your response metrics. And besides, from a marketing perspective, crafting personable and human-oriented content with an active writing style increases engagement and readability. Afterall, your message is ultimately communicating that you’re unable to reply at the moment, so you’ll want to make sure to emphasize the human element here as much as possible.
It’s also important to note that you’ll want to avoid the inclusion of any contact information or links at any point within your eBay auto-responder messages. Doing so would be in direct violation of eBay’s messaging policies and could result in account penalties, not to mention that your reply would likely fail to ever reach your customer’s inbox.
Crafting Unique Holiday Auto-Responder Messages
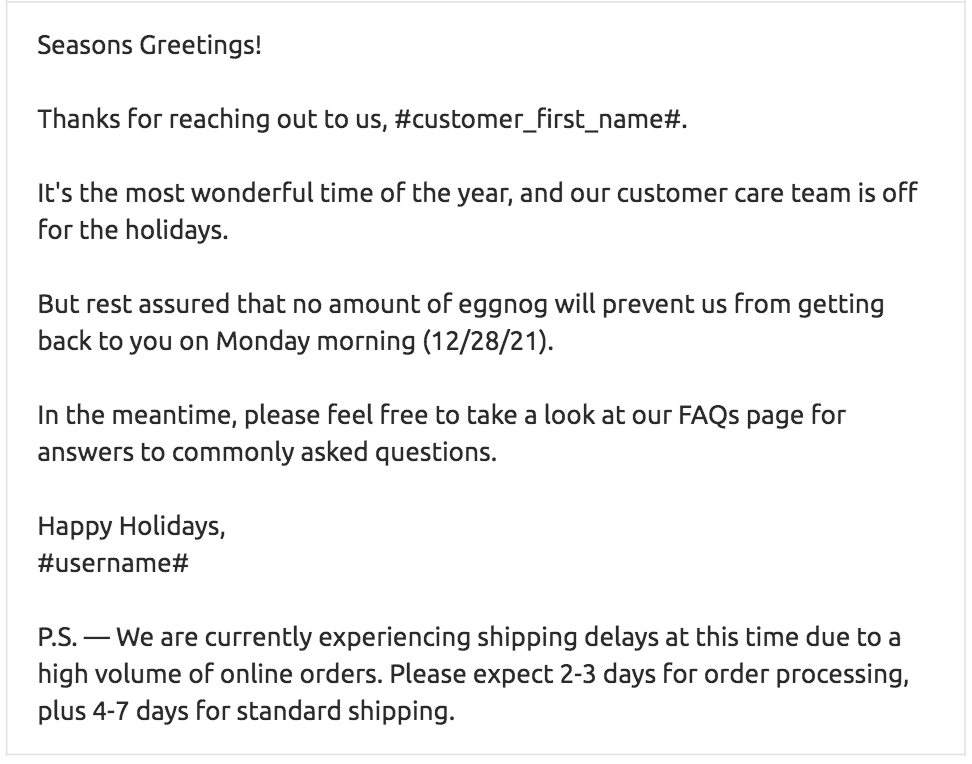
Now for the fun part! The holidays offer a great opportunity to reinforce your brand’s voice with a fun and friendly message while proactively addressing customer concerns. And with Replyco’s custom tags, you can personalize your responses to an even greater degree, as we’ll see later in this article.
When drafting your holiday auto-responder content, consider whether or not there are any prevalent issues that your customers might be contacting you about. If so, be sure to acknowledge those issues in your auto-response. For example, in last week’s blog, we discussed the anticipation of widespread shipping delays this holiday season. Your holiday auto-responder is an ideal place and time to re-emphasize this to your customers, along with any other information that would be useful to them. Doing so could save you time responding to customers later. Plus, at a very minimum, it demonstrates that your company values customers’ time.

There’s no shortage of ideas for creatively crafting a fun and engaging auto-response message. Humorous writing, clever jokes, and graphics are all on the table, so long as they’re used in a way that aligns with your brand voice and tone. However, a simple and clear message that successfully communicates to the receiver that a team member will contact them as soon as possible will suffice. For more inspiration, check out HubSpot’s list of humorous out-of-office templates.
How to Create an Auto-Response Template in Replyco
Now that we’ve covered the best practices for creating the perfect holiday auto-responder message, we’ll show you how to implement it within Replyco.
Step 1: Go to Templates
From the Replyco homescreen, click the Tools panel on the left hand side, and from the sub menu, select Templates.

Step 2: Create a Template
Now, click the “+ Create new” button, located in the right-hand corner of the screen.
This will bring up the template editor.

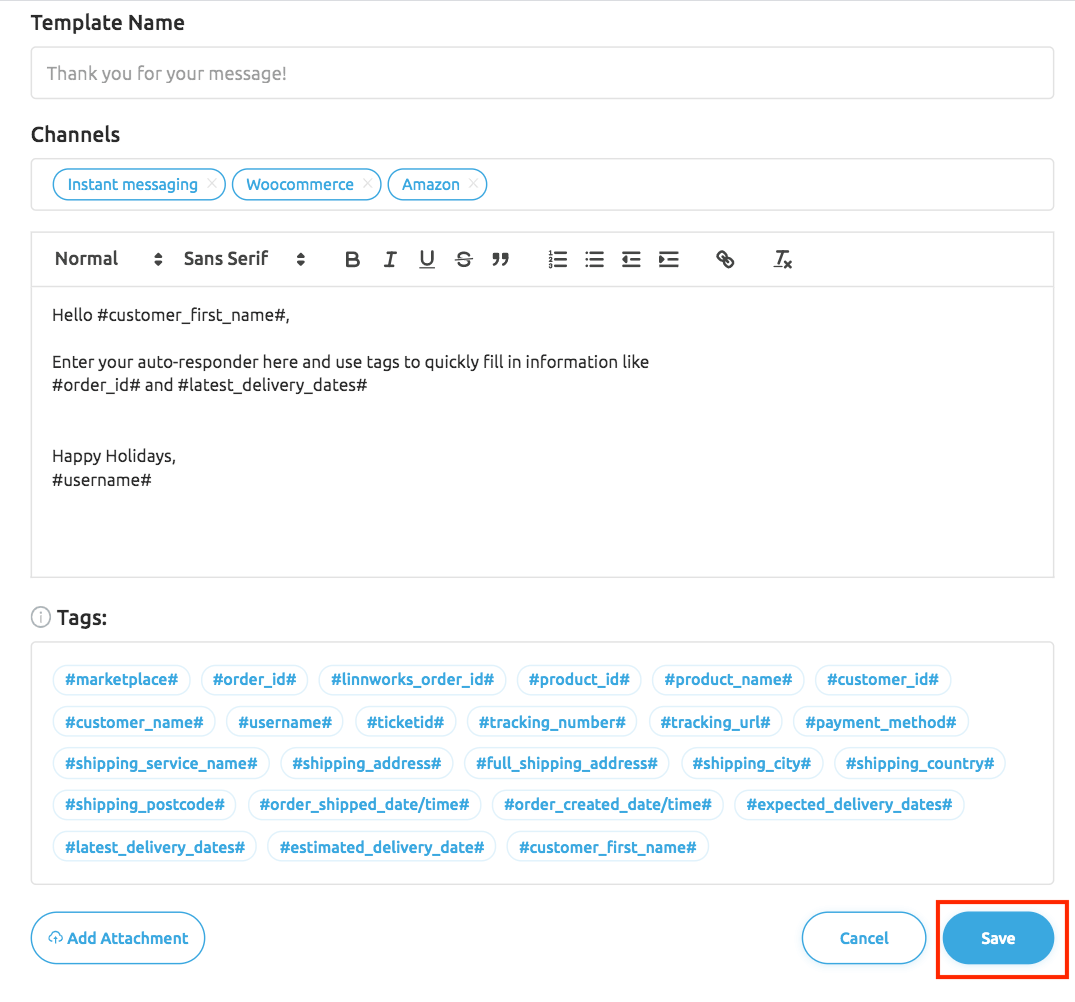
Step 3: Create a New Template
This is where the magic happens!
- Template Name: In this field, enter the subject line of your email such as “Thank you for your message!”
- Channels: Here, you will choose which marketplaces this auto-response template will be used with. You’re free to assign it to as many channels as you want, or make a template specific to each channel, such as Amazon, eBay, and Shopify (just remember not to include any contact information or links in your eBay messaging).
- Tags: When you click on any of the tags below the text editor, Replyco will automatically insert the relevant information such as Customer Name, Order ID and more, allowing you to further personalize your auto-response messages.
Once you’re done writing your auto-responder message in the text field, click Save in the bottom-right corner.

How to Set Up Auto-Response Rules in Replyco
Halfway there! Now it’s time to set up some rules for when to activate your auto-responder holiday message.
Step 1: Create a New Auto-Response Rule
Now, head back to the Templates page you were just on. Scroll down and you’ll see a subsection titled “Auto-response Rules.” Click the “+ Create new” button to the right.

Step 2: Fill in the Auto-Response Information

- Rule Name: Give your rule a name that represents its function — in this case, we’ll go with “Holiday Break.”
- Template to Send: Click the dropdown menu and select the template we created earlier (this is also the subject line).
- Affected Channels: Similar to when we were creating the template, here we’re specifying which marketplaces our auto-response rule will affect. You’ll probably want to go ahead and select the same channels you assigned when creating the template above.
- Date Range: When will the auto-response become active? For this example, let’s go from Christmas Eve to the following Sunday.
- Delay Range: Sending your auto-responder message out with a slight delay is an important tactic to increase the likelihood of your reply message counting towards your response metrics. In the example below, the message will go out at a random interval between 0 and 15 minutes.
- Frequency: This option gives you the choice of sending out the auto-response every time a message is received from a given customer, or replying only the first time.
- Days: Choose the days of the week that you want the message to be active.
- Active Between: Choose which hours of the day you want the auto-responder message to be active.
Step 3: Configure the Conditions to Trigger an Auto-Response

Last but not least, we’ll assign some conditions that will trigger the auto-response. Keep in mind these are only suggestions.
If, for example, an incoming email contains the word “refund,” you may not want to send an auto-response as this type of message might necessitate direct human interaction (or you could set up a separate auto-response for messages about refunds). In this case, you would set the condition as follows:
Client email —> Does not contain —> refund
On the flipside, you might want to send an auto-response that contains details about average shipping times to anyone asking about their order details. In this case, you could set up a condition similar to:
Client email —> Contains —> where is my order (or even just, “where is my” or, “where’s my”)
Next, you’ll want to identify messages that are from your actual human customers, instead of having your auto-response triggered by incoming emails that are merely auto-notifications from Amazon and eBay for example.
Including a condition such as Client email —> Contains —> marketplace.amazon helps ensure that your auto-responder will only trigger for emails coming from real Amazon customers.
Similarly, on eBay, including the condition Client email —> Contains —> members.ebay.com will increase the odds that your auto-responder will only trigger for emails coming from real eBay customers.
Feel free to add as many conditions as you see fit. Once done, click the Save button in the right-hand corner.
That’s It — Your Replyco Holiday Auto-Responder Is Good to Go!
Creating thoughtful and relevant auto-responders for the holiday season is a great way to keep your customers top-of-mind while your team is out of the office. With Replyco’s set of auto-fill tags, along with streamlined rule creation for all of your eCommerce platforms in one place, managing the holiday rush has never been simpler. For more information on using auto-responders and creating templates, check out our Help Docs or feel free to reach out to us for help with any step of the process.


